The goal of this post will be to automate our security testing by running a Zed Attack Proxy (ZAP) scan on a regular interval using TeamCity. For an introduction to ZAP, take a look at my previous post.
Table of contents
Overview
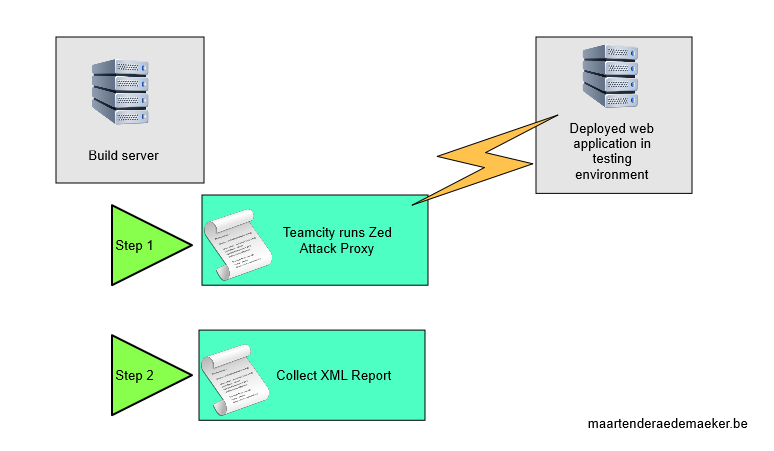
The plan is to be able to automate our Zed Attack Proxy scans from TeamCity. In this blogpost I’ll use teamcity as example, but the concepts should apply to any other build server as well.
In this setup we’ll assume a web application is deployed to a seperate environment by another automated proces. In our build configuration we’ll target that web application using Zed Attack Proxy. For the purpose of this example, I deployed an instance of this sample solution.
The following section will be about running ZAP from the commandline, while the section after that will explain how to use this knowledge to automate it in our teamcity build.
Running ZAP from the commandline
Right, first of all, we need to be able to run a ZAP scan without using the UI.
In our ZAP installation directory (on windows, the default is: C:\Program Files\OWASP\Zed Attack Proxy) we are able to find ‘zap.bat’.
You’ll notice that, if you try to run it from a working directory different of the installation directory you’ll get an error.

To be able to run the tool, you’ll need to change your working directory to the ZAP installation directory, or if you’re using powershell, you can use the Start-Process commandlet, and pass in the ‘WorkingDirectory’ parameter. Something like this:
1 | Start-Process -WorkingDirectory "C:\Program Files\OWASP\Zed Attack Proxy" |
When we’ve resolved the working directory issue we want to figure out the possible arguments to the commandline tool.
We can pass the 1
2
3
4

We're able to figure out how to run a scan now.
zap.bat
-quickurl “
-quickout “
-cmd -quickprogress1
2
3
4
5
6
7
8
9
10
11
12
13
14
15
16
17
18
19
20
21
22
23
24
25
After the command completes (which could take very long, depending on your application size), we should see something like this:

Jikes, it looks like ZAP found some issues!


Let's hope you were doing a better job at preventing these issues :-). If not, luckily you've detected them now.
# <a name="teamcityconfig"></a> Setting up the TeamCity configuration
Ok, time to set up a build configuration.
You'll see two steps.

* Step 1: Running Zed Attack Proxy. In these step we'll use what we've learned in the previous step.
* Step 2: This could be implemented however you'd like. Since we've generated a report xml file, we'd probably want to do something with it. Maybe we'd put it on a file share, or perhaps we could parse it and send a mail to the development team if a high level issue has been found.
Step 1:
* We'll select the ```command line``` runner type.
* We'll click 'show advanced options' and enter ```%zap.InstallationDirectory%``` in the working directory box, which is a new variable we'll give a value later on.
* In the 'Command executable' box, we'll enter ```%zap.InstallationDirectory%\zap.bat
- In the ‘command parameters’ box we’ll enter the following:
-quickurl %zap.url% -quickout "%system.teamcity.build.workingDir%\zap-report.xml" -cmd -quickprogress
It should look something like this:
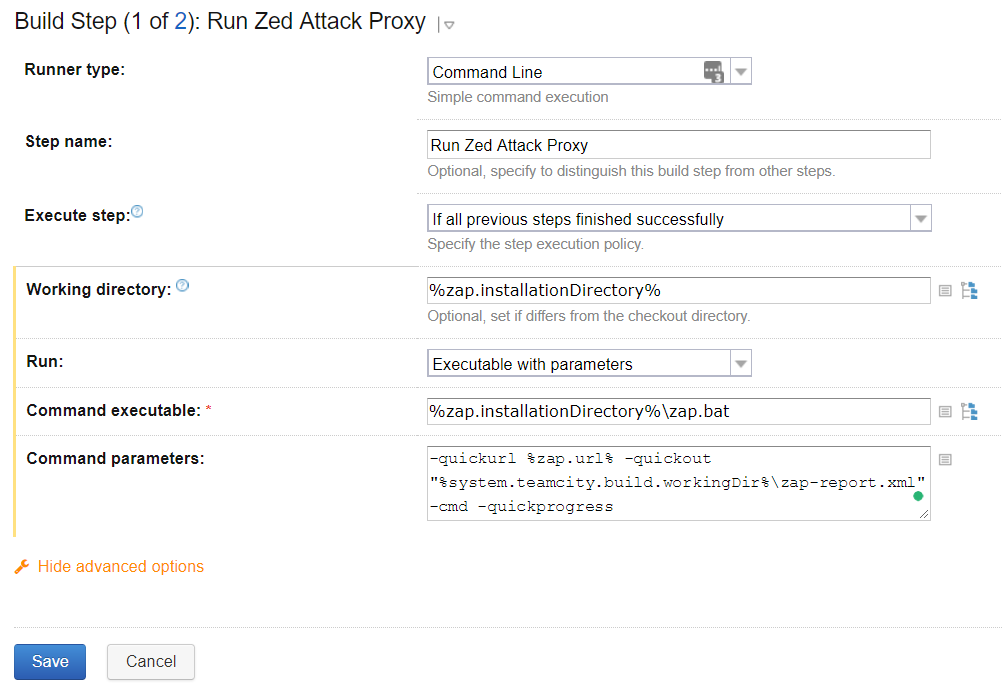
What we’ve done in this step is simply executing the command we’ve discussed before, but while using some variables instead of hardcoding everything.
The system.teamcity.build.workingDir variable is a variable set by TeamCity, as expected, it contains the working directory of our build.
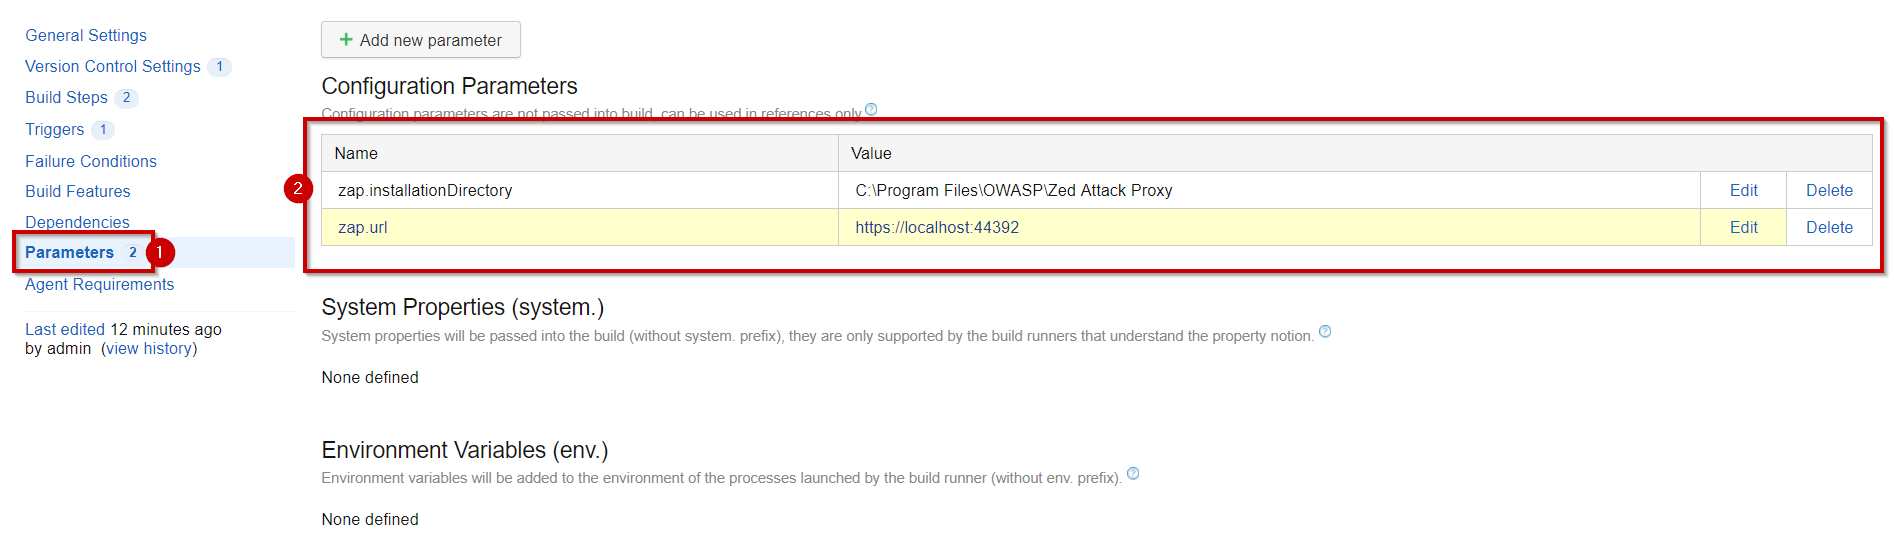
The zap.InstallationDirectory and zap.url will be defined by us to extract away the parts that might change.
We can give them a value in the parameter tab.
Once we’ve verified that the configuration works, we can figure out step 2, where we’ll do something with the report. (up to you)
Conclusion
It seems rather easy to get started automating a “quick scan” of Zed attack proxy.
It might be also interesting (but much more maintainance / setup effort) to figure out the “regression testing approach”, but the approach we used here seems to do as a quick starting point.
It would be nice to use a tool to get the reports available to all team members, like for example SonarQube. I found a plugin online, though, for now it seems like the latest major Sonar release introduced some major breaking changes to one of their API’s and the plugin maintainer is waiting for more stability (see this github issue).